GCBuddy V4.1 User Guide
This user guide describes all features of the geocaching application GeoCaching Buddy (GCBuddy in short) for the iPhone/iPod touch. This application can be used to:
- Prepare a multi-cache hunt at home, on the device or using a web interface
- Navigate to the parking location
- Enter answers to questions posed at a waypoint
- Calculate new waypoints using these answers
- Take pictures while caching
- Calculate the cache location using all answers found
- Make log notes while caching
- Find your way back to the parking
- Backup all information entered for this cache
- Manage the list of caches
Just read on to get an explanation of all features available on each particular screen.
Cache List
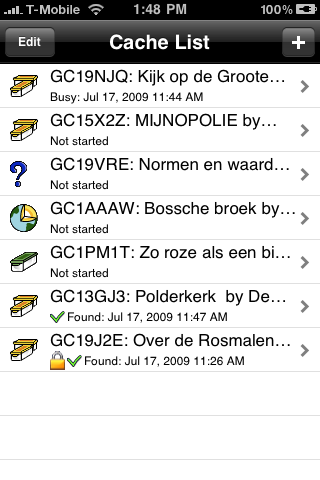
The Cache List view shows the list of caches stored in GCBuddy.
Each type of cache has a different icon.
- Multi-cache
- Puzzle (or mystery cache)
- Traditional cache
- Earth cache
Status of a cache can be:
- Not started
- Busy, date indicates last arrival to a waypoint
- Found, date of arrival at the cache location.
When the cache location is visited also a checkmark is shown The lock icon before the status indicates a cache is locked and cannot be modified (read-only mode).
The + button allows you to manually enter a new cache. You can Cancel this action or specify one of the cache types to add (the cache type can later be changed in the Cache Info view). Or choose to show the 3th party web app at: http://iphonecaching.appspot.com/ to search for a new cache and export it to GCBuddy.
The Edit button switches the list into edit mode described below.
Selecting an item in the list navigates to the Geocache View for that particular cache.
Cache List (edit mode)
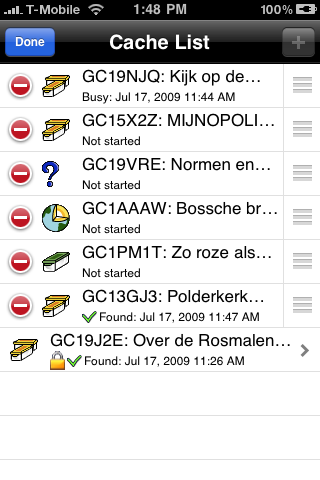
After pressing "Edit" the list enters edit mode. In this mode the various list items get a "-" button on the left hand side and a move handle on the right hand side.
To delete a cache from the list press the "-" button and confirm by pressing the appearing Delete button. You can also use the swipe gesture.
To re-arrange the caches in the list press and hold the move handle and drag the item to a new position in the list.
Note that locked (read-only) caches cannot be deleted or moved.
To exit the edit mode, select the done button.
Geocache View
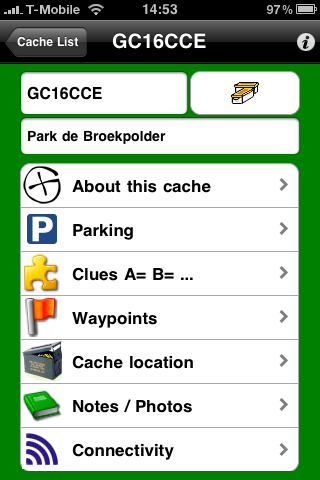
This view is the main menu to select an action on this particular geocache.
The geocache code and name can be modified by selecting the corresponding text fields. A keyboard will appear.
The cache type icon (and optional found and locked icons) can be selected to show the Cache Info View.
The action list below the name can be used to navigate deeper into the information available for this geocache.
The info icon on the top right shows the About view.
About View
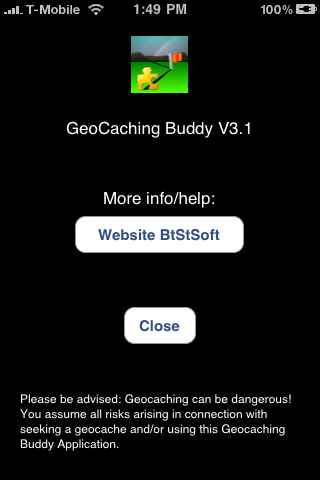
This view shows the exact version installed on your iPhone.
For more info and help a button "Website BtStSoft" will start the Safari browser with the support site of GCBuddy loaded.
This view can be closed using the "Close" button.
The somewhat humorous but probably legally inspired advise at the bottom of this view is copied from the Groundspeak official geocaching app for the iPhone. But seriously: ask a human buddy to join you while going out geocaching! It is not only more fun but also safer when you both keep an eye on each other. GCBuddy really can't do that for you ;)
Cache Info View
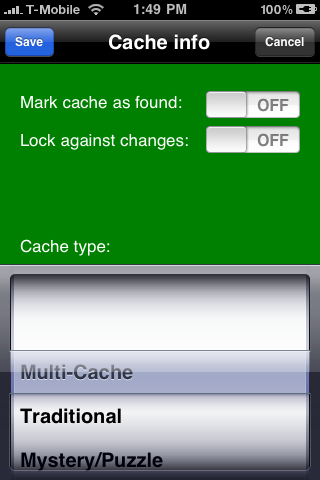
This view allows you to:
- Switch the cache found status on/off.
- Lock this cache against any modifications, effectively making it read-only.
- Modify the cache type.
About this cache
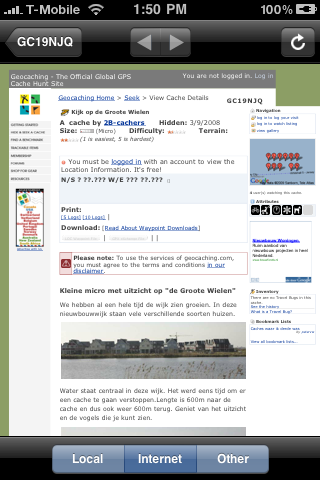
This view show the cache description. On the bottom of the view you can select the source of this information:
Local:
The information you have entered yourself about this cache either using the keyboard or using the web interface. Local does not need an internet connection. All images which are linked to in the local description are stored locally as well! Refreshing these is done when they are older than 24 hrs and internet is available.
Internet:
The information provided by the web site geocaching.com (for caches starting with GC) or opencaching.de (for caches starting with OC). You need Internet connectivity to read this information.
Other:
When the cache was loaded into GCBuddy from an external native application, this entry allows you to return to that external application to show the stored info for that cache using that external app. Currently only iGeocacher is able to transfer caches to Geocaching Buddy.
Even if iGeocacher was not the originating application, you can still ask iGeocacher to show the info if it is available in it's database.
Parking

This view is used when starting the cache as well as after finding the cache to return to your parking location.
Most caches have a location in their description with a good parking spot. At home you have typically entered the latitude and longitude of that parking spot into this view or using the web interface.
When traveling to the start of the cache you can use the "Navigate" button to call up the view aiding in the navigation to that location.
Once arrived it is possible you park your car/bike somewhere else. Selecting the button "Park Here" will use the GPS to mark that spot in the latitude and longitude edit boxes.
Park Here (prompting)
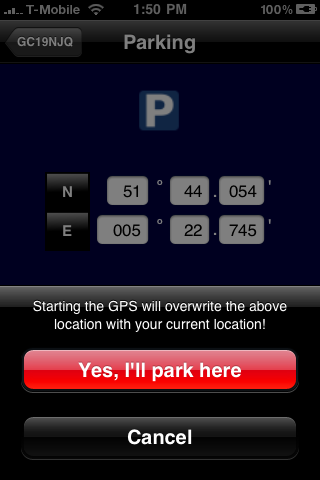
A warning that this "park Here" function will overwrite the stored location will be given with the possibility to cancel the process.
If you select Cancel, the parking location will not be modified.
If you select "Yes, I'll park here" the GPS is started and it will attempt to determine the iPhone's location as accurately as possible.
Park Here (Locating)
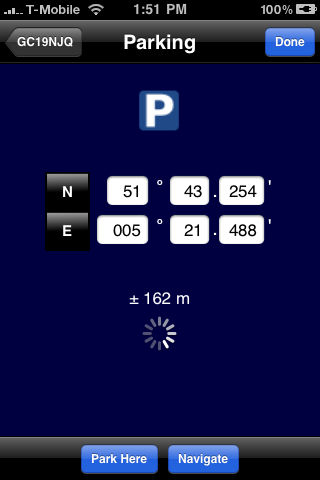
While the GPS determines the location of the iPhone you will see a spinning activity indicator.
The accuracy above this activity indicator allows you to determine if the location is accurate enough to find this spot back later on.
Pressing "Done" (or any other action resulting in leaving this view) will store the determined location as the parking location for this geocache.
If you want you can check the location using the "Navigate" button which shows distance and bearing to the parking location.
Clues List
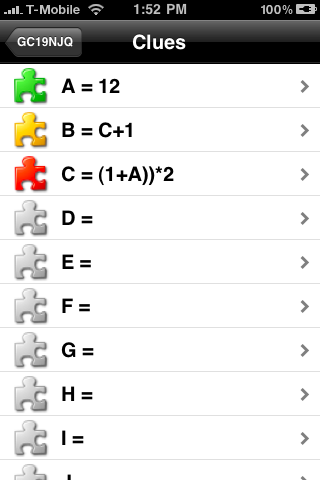
The clues list shows all clues (A...Z) with their corresponding values or expression (if the value cannot be evaluated yet).
Each piece of the puzzle is color coded with the following meaning:
- Green: A formula is correctly evaluated to a value
- Yellow: Some information is missing so the formula can't be evaluated
- Red: The formula contains a syntax error
- White: No formula was entered for this clue
Selecting a clue shows a details view for that specific clue.
Clue View
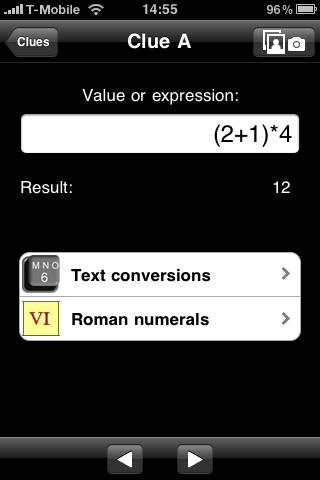
The Clue View shows the expression (formula) to determine the value for that clue.
Below the text field containing the expression, the result of that calculation is shown as a numerical value.
Please note that only integer values are supported. Floating point calculations are rare while determining a clue value. If you need these use the regular calculator.
Errors will be generated in case of:
- A syntax error e.g. no matching bracket
- A cyclic reference e.g. A=B, B=A
- No value is available for another clue
You can modify the expression by selecting that text field. A Formula Editor will appear (see below).
Two special calculators can be started to determine the value for a clue from a text or from roman numerals.
Use the left and right arrows in the toolbar to quickly change which clue is shown in this view.
From this view you can also start the in-app photo camera.
Formula editor (Clue)
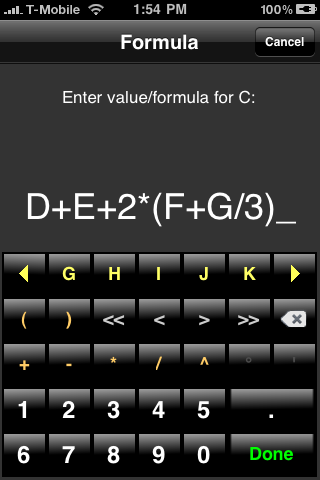
Enter a formula using the keys on this editor. The top row contains the other clue names so you can use them here. Use the arrows to reach the other characters.
The orange characters ( ) + _ * / ^ are used to build an expression.
The light grey keys <<, <, > and >> are used to control the cursor (visible as the underscore character _ )
The digits 0 ... 9 are used to enter numerical values.
Press Done to use the entered formula.
Press Cancel to cancel the change.
Text conversions
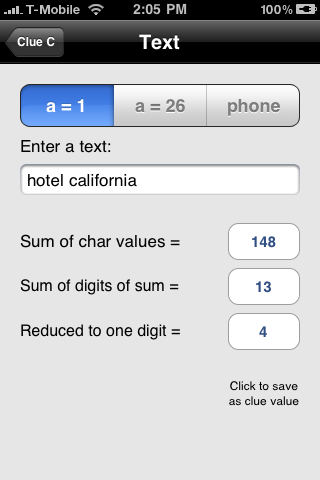
The text to number conversion mode can be:
- a=1, b=2, c=3 etc.
- a=26, b=25, c=24 etc.
- phone pad: abc = 2, def = 3, etc.
When entering a text three values are calculated and shown. Use one of these values as the value for this clue by selecting it.
You can cancel this conversion by selecting the back buttton in the top left corner.
Text conversions
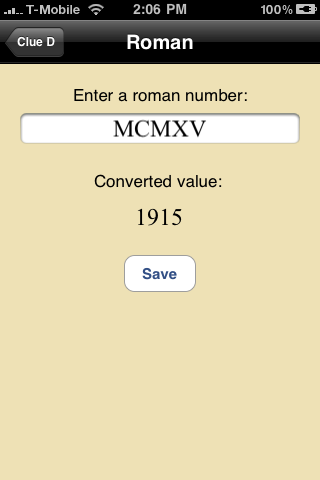
When entering a roman number, the decimal value is shown. Select the save button to use this as the value for this clue.
You can cancel this conversion by selecting the back buttton in the top left corner.
WayPoints list
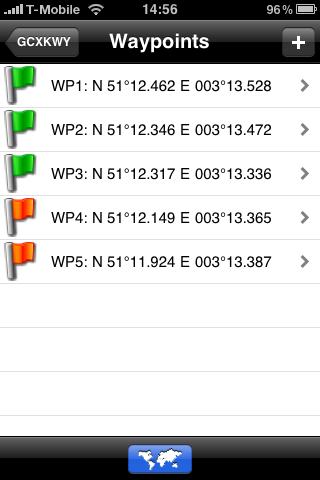
This list shows all entered waypoints for a multi-cache. The waypoints are numbered WP1, WP2 etc. Note that the cache is not a waypoint, it has its own entry in the geocache view.
Adding a new waypoint can be done using the "+" button on the top right.
Deleting a waypoint can only done for the last waypoint. Swipe your finger from left to right on the last item to show the delete button.
Each item in the list shows the latitude/longitude as calculated from the formula's entered for this waypoint.
To edit a waypoint, navigate to it or to read more information about what to do once arrived at a waypoint just select it from the list to show the WayPoint View.
The color coding is as follows:
- Green: Arrived at this waypoint = Yes
- Red: Not yet arrived at this waypoint.
The button in the toolbar can be used to show an overview of all known waypoints, parking, cache and your location.
WayPoints Overview
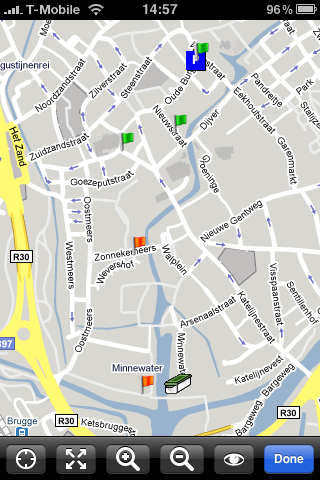
This map shows all waypoints, the parking, optionally your location and the cache location.
Only waypoints for which the entered formula can be evaluated to a location are included in this view.
The toolbar contains buttons for:
- Show your current location on/off. On an iPhone 3GS a third option is available: map rotation so it corresponds to your viewing orientation.
- Autozoom so that all markers are visible.
- Zoom in a factor of two.
- Zoom out a factor of two.
- Switch the map mode between normal, satellite and hybrid.
- Done closes this view.
You can select any waypoint to switch to that waypoint by clicking the disclosure button.
WayPoint View
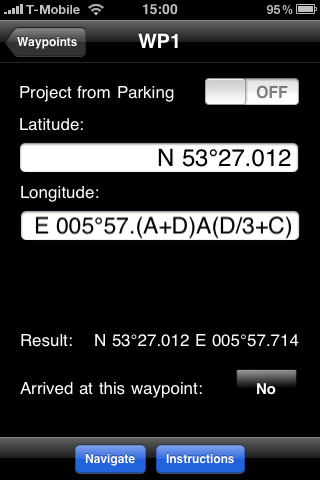
The WayPoint View can show a waypoint in one of two modes:
- Latitude/longitude formula's
- Project from previous waypoint
The switch on top of this view selects between these two modes.
When projection is off, the latitude and longitude of this waypoint can be entered using the formula editor for both values.
The result after evaluation of both expressions is shown as the result in WGS84 format.
If this result is valid (both expressions can be evaluated) the Show Map and Navigate buttons will be enabled.
The "Arrived at this waypoint" setting can be set to Yes or No. Setting it to Yes marks the current time as the last activity time shown in the cache list.
Navigate starts the internal Navigate View with this waypoint.
Instructions show previously entered instructions for this specific waypoint.
WayPoint View (Project)
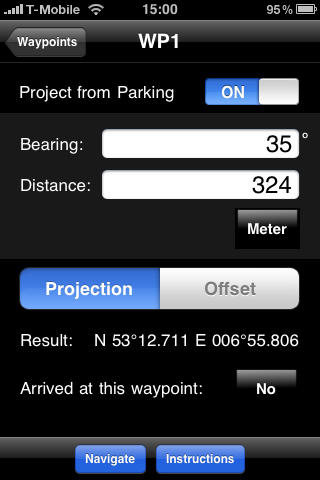
In the Project mode you have again two ways to project from the previous waypoint to this waypoint.
This mode is selected using the select switch "Projection" / "Offset"
When projection is selected the bearing and distance (in meter or feet) can be selected. These edit boxes can be selected to enter a value or a formula using clues.
The Result is the WGS84 location of the calculated projection from the previous waypoint.
WayPoint View (Offset)
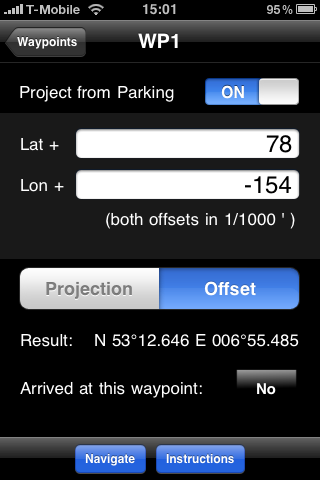
When "Offset" is selected the change in latitude and latitude can be specified in 1/1000th of a second.
If you have to subtract a value from latitude or longitude simply enter a negative value for that offset.
These edit boxes can be selected to enter a value or a formula using clues.
The Result is the WGS84 location of the calculated projection from the previous waypoint.
Navigate View
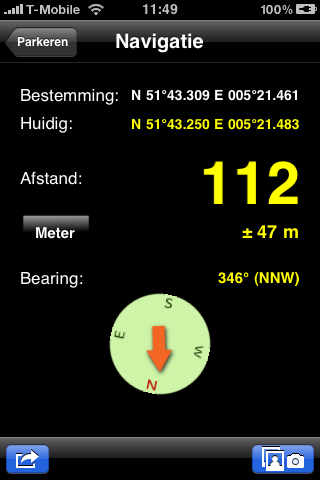
The Navigate View shows the destination waypoint and the current waypoint. From these two locations the bearing and distance is calculated and shown
The accuracy of the current location is shown numerically but also by color coding these values:
- Green: Good accuracy
- Yellow: Reasonable accuracy
- Orange: Questionable accuracy
- Red: Bad accuracy
The simple compass shows which direction to go in order to reach the destination. When your device contains a magnetometer (e.g. iPhone 3GS) this compass auto-rotates so it is aligned to the earth magnetic field.
The icons on the bottom interface interface to three external apps for easier navigation (only visible when installed):
- GeopherLite directional compass
- Maps app (Internet required)
- iGeocacher SAR (Search and Rescue) compass
These external apps receive the destination location from GCBuddy.
GeopherLite and iGeocacher have special return buttons to return back to Geocaching Buddy without having to manually restart it.
The Maps application requires Internet connectivity. After closing the Maps app you'll have to manually restart Geocaching Buddy.
From this view you can also start the in-app photo camera.
Instructions View

Once you approach a waypoint you would typically select the Instructions button showing any previously entered text instructing what to do/search at this waypoint.
You can prepare a multi-cache at home by entering what to do here in this area.
Since often clues are discovered at a waypoint a quick link to the Clues View (Show Clues) is available in this view as well.
The Next Waypoint button switches the "Arrived at this waypoint" setting for this waypoint from No to Yes. It also selects the next waypoint (or cache) as the new destination for the navigation view.
Cache View
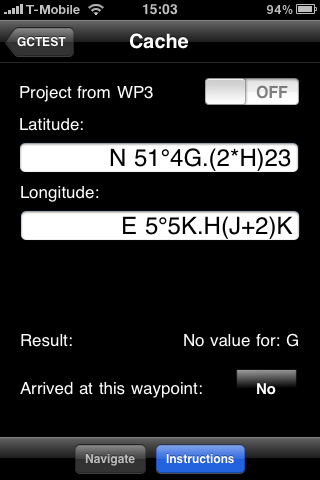
The Cache View is very similar as the waypoint views described above. The special meaning of the cache is clear: it's the last waypoint and typically the end of the multi-cache.
Switching the "Arrived at this waypoint" to Yes here marks the geocache as found in the geocache list view.
NOTE: In version 3 the found date is only stored for multi-caches. This is a bug and will be fixed in a future version.
Notes View
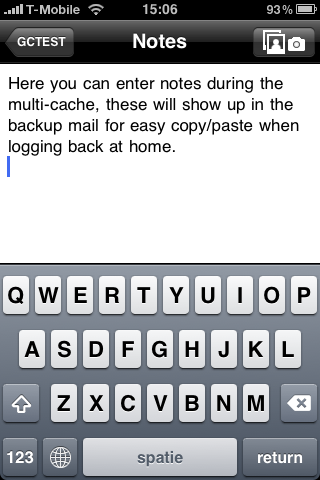
When doing a multi-cache often you want to remember specific field notes for your log later at home.
This edit box allows you to enter these field notes whenever you want.
Once you backup the geocache using the mail backup system you can easily copy/paste these notes from the received e-mail on your normal home PC.
The button in the navigation bar can be used to show the in-app photo album/camera view. This view can be used to have a look at the photo's taken during the multi-cache.
Note that this view can also be shown from some other views. They all store the photo's in a photo album coupled to this particular cache.
Photo Album View
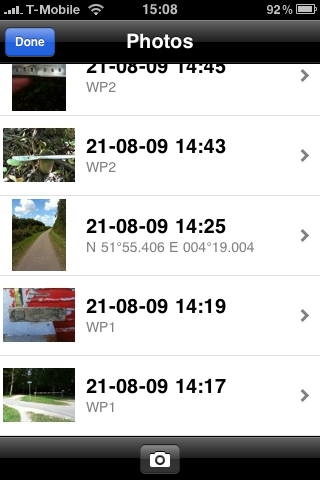
A lot of people take photo's at each waypoint to document their discoveries. Switching to the camera app is inconvenient so Geocaching Buddy contains a dedicated photo album for each individual cache. All photos related to this cache are stored in this album.
Each photo is accurately tagged with the time and GPS location. This information is shown next to each thumbnail picture.
When a photo is taken within a distance of approx. 25 meter from a waypoint location, the list shows the name of that waypoint.
If you want to look closer at a photo, just select it to show the internal photo viewer.
Adding a photo is simply a matter of selecting the camera button in the toolbar. The camera view will appear allowing you to take a new picture using the standard camera controls.
Photo Viewer
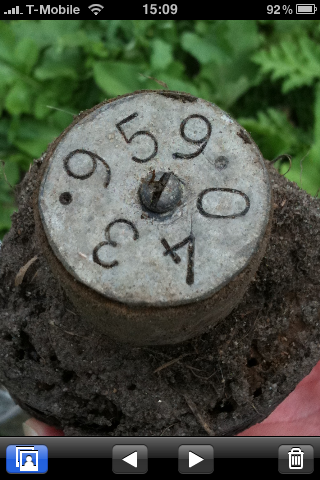
The internal photoviewer shows the current photo. Using the arrow keys you can quickly switch to previous and next photo.
When you use the familiar zoom and pan gestures on the photo, the raw high resolution photo is loaded (this takes a few seconds) and you can see all the details you want by zooming and panning.
The viewer also contains a button to delete a photo. A confirmation dialog is shown before the delete operation is actually performed. Cancel it if you press this button by accident.
To go back to the album use the blue button.
Connectivity
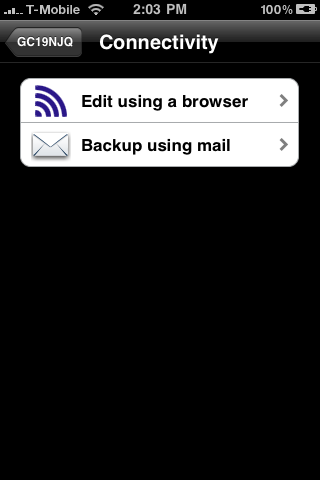
When you have an Internet connection available you have several convenience functions available:
Edit using a browser
Switches the iPhone into a mode where it acts as a local web server on your home network. Now you can enter lots of information for this cache using a convenient web interface. So instead of using the small iPhone keyboard you can now use a regular PC/Mac keyboard and larger screen. It also allows you to copy/paste information from the cache description shown in another browser window/tab into the various waypoints and other description fields.
The browser also shows the list of photo's and allow you to download the raw (high resoluton) pictures taken while solving this cache. So afterwards you can save any important picture (typically several Megabytes in size) to you PC/Mac using your fast network connection at home.
Backup using mail
Sends a mail to any mail address containing the relevant information about this cache. This mail acts as a (textual) backup of this cache.
Photo's are not included since these are relatively large in size. Use the browser interface instead.
Edit using a browser
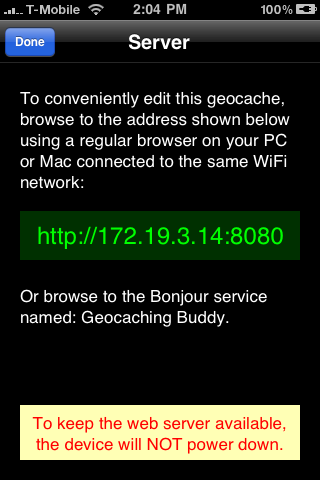
When this view is visible the iPhone acts as a local web server.
Using a browser on a PC or Mac connected to the same home network as your iPhone you can now go to the URL displayed in the green bar.
Note that in Safari on a Mac a Bonjour bookmark is visible which jumps to this URL. No need to type it over.
If you use another browser or Windows PC without Bonjour, just type in that URL in the address field.
NOTE: It is adviced to connect your iPhone to a power supply when editing a cache this way. To keep the web server available the iPhone will not power down when this view is visible!
The web based user interface is self explanatory and allows all relevant pieces of information about the currently selected cache to be entered / modified.
Any photo present in the photo album for the currently selected cache can be downloaded using this interface as well.
Backup by e-mail
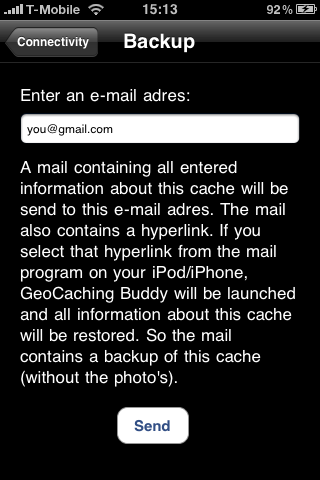
This view describes in short what happens. You can enter any e-mail address here and an e-mail with all entered information about the cache will be send to this e-mail adres.
The received email contains a link which can be used on an iPhone/iPod touch again to launch GCBuddy and completely restore all entered information for that cache.
Archiving caches this way in your mail system allows you to keep the list of caches in GCBuddy manageable small while still being able to look at your results at a later moment.
Note that photo's for each cache are kept in a photo album which are deliberately not included in this mail.
e-Mail generation
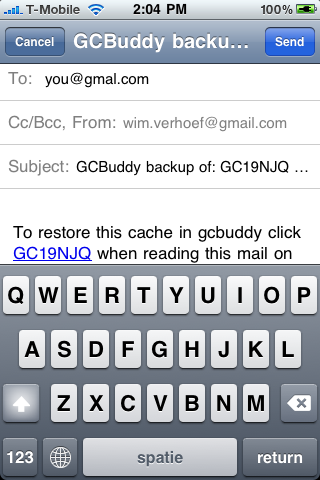
After pressing send in the above view, a compose mail view is started and the To: Subject: and body of the mail is filled.
You can type any additional information you like before sending the mail to the receiver.
If you don't want to send the mail just select cancel.
The mail contains a specially crafted link which restores all textual information in GCBuddy when selected on an iPhone/iPod touch.